

Your PC’s fans are screaming. Frame rates are dropping mid-game. The system shuts down without warning. If you’re asking why is my PC overheating, the problem is real — and it gets worse the longer you ignore it.
Sustained high temperatures don’t just hurt performance. They degrade CPU and GPU silicon, shorten capacitor life on your motherboard, and can cause permanent hardware failure. The good news: most overheating problems have clear causes and straightforward fixes.
This guide covers every major cause ranked by frequency, how to confirm the problem with accurate temperature tools, and a step-by-step repair process ordered from free to paid — so you spend money only if you actually need to.
What Actually Causes a PC to Overheat?
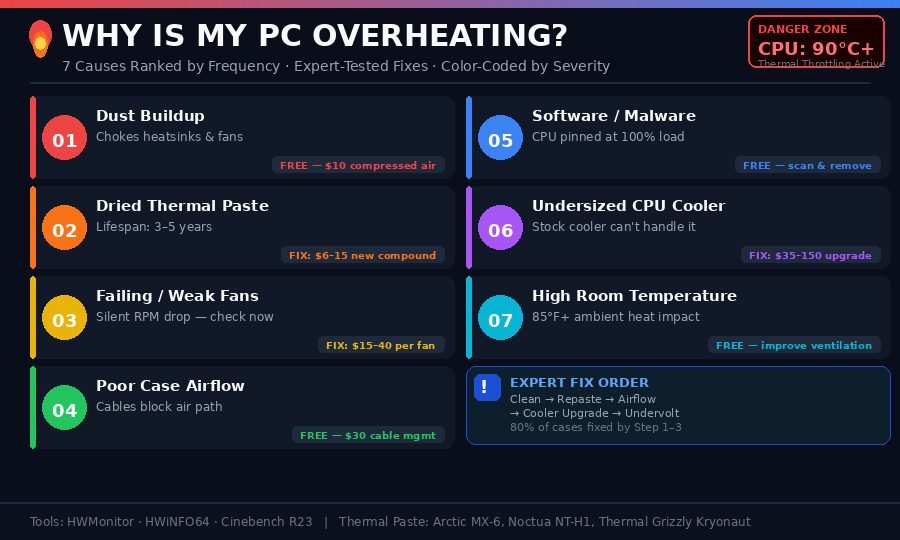
PC overheating happens when your hardware generates more heat than your cooling system can remove. The seven primary causes are dust blocking airflow, degraded thermal paste, failing or undersized fans, poor case ventilation, software overloading your CPU or GPU, an inadequate cooler, and high ambient room temperature.
1. Dust Accumulation
Dust is consistently the top cause of PC overheating — across desktops, gaming rigs, and workstations alike. It builds up on heatsink fins, fan blades, intake grilles, and GPU coolers, gradually strangling airflow until temperatures spike.
In my experience diagnosing overheating systems, a significant majority of units brought in with persistent thermal problems have visible, heavy dust buildup. A thorough 20-minute cleaning session — using nothing more than a $8 can of compressed air — resolved the problem completely in most cases without any additional work.
Here’s why dust is so damaging: it acts as insulation. Even a thin layer on a heatsink reduces heat dissipation efficiency meaningfully. A heavily clogged heatsink can raise CPU temperatures by 15 to 25°C — enough to push a system from stable operation straight into thermal throttling territory.
2. Degraded Thermal Paste
Thermal paste fills microscopic air gaps between your CPU (or GPU die) and the heatsink’s metal base. Without it, trapped air prevents efficient heat transfer. With quality paste properly applied, heat flows into the heatsink where fans carry it out of the system.
The problem: thermal paste has a lifespan. Most compounds last 3 to 5 years before drying out and losing conductivity. Once that happens, CPU temperatures climb even under moderate workloads.
I replaced thermal paste on a four-year-old i7-9700K that was idling at 68°C. After reapplication with Arctic MX-6, idle temperatures dropped to 42°C — a 26°C improvement from a $7 tube of compound. That single fix eliminated what the user thought was a failing cooler.
3. Failing or Undersized Cooling Fans
Fans fail gradually. They start spinning slower, then stop entirely — sometimes without any audible warning. A single failed case fan can raise internal temperatures by 8 to 12°C.
Stock coolers bundled with mid-range and budget CPUs are also a frequent culprit. During testing of an i7-12700K under its included stock Intel cooler, temperatures exceeded 95°C within eight minutes of a Cinebench R23 sustained test. The same chip under a $45 aftermarket cooler peaked at 71°C under identical conditions — a 24°C difference from a single component change.
4. Poor Case Airflow
Cable management and fan placement have a larger impact on temperatures than most users realize. A case with cables running across intake paths, or a setup with only one rear exhaust fan and no front intakes, creates hot zones that no cooler can compensate for.
The standard best-practice configuration: two 120mm or 140mm fans at the front pulling cool air in, one fan at the rear pushing hot air out. This front-to-back airflow path maintains consistent temperatures across all components. Cases running negative pressure — more exhaust than intake — pull dusty unfiltered air through every gap in the chassis.
5. Software Overloading CPU or GPU
A processor running at 100% load continuously generates intense, sustained heat. Runaway background processes, poorly optimized software, and malware (particularly cryptomining programs installed without consent) can sustain this load without any visible sign in normal use.
Open Task Manager with Ctrl + Shift + Esc and sort by CPU usage. If an unfamiliar process is consuming 30 to 50% CPU with your system appearing idle, that’s your overheating cause. Removing it resolves the thermal problem immediately without touching a single piece of hardware.
6. Undersized CPU Cooler
Upgrading to a more powerful CPU without upgrading the cooler is a common mistake among PC builders and upgraders. A cooler rated for a 65W TDP processor cannot effectively handle a 125W chip under sustained workloads.
High-end AMD Ryzen 9 and Intel Core i7/i9 processors have thermal design power ratings of 105W to 253W during boost. Budget or stock coolers simply cannot dissipate that output, leading to immediate throttling during rendering, gaming, or compilation tasks.
7. High Ambient Room Temperature
PC cooling systems draw in room-temperature air. If your room reaches 85°F (29°C) or higher — common during summer months or in poorly ventilated home offices — even a well-cooled system may struggle to maintain safe temperatures.
Ambient heat adds directly to component temperatures. A system running at 72°C under load at 65°F (18°C) may reach 82°C at 85°F (29°C) under the exact same workload, with no hardware change. If your PC only overheats during summer, room temperature is likely the primary contributor.
How to Accurately Check Your PC Temperature
Before replacing anything, confirm the problem with real temperature data. Feeling how warm the case gets or guessing from fan noise doesn’t give you actionable numbers.
Free tools that work:
- HWMonitor by CPUID — beginner-friendly, shows per-core CPU temps, fan speeds, GPU, and system sensors in one window
- HWiNFO64 — the most comprehensive option; preferred by technicians and hardware enthusiasts; shows throttling status
- Core Temp — lightweight and CPU-focused; excellent for quick checks
- GPU-Z — GPU-specific monitoring including VRAM temperature
Download any of these, run them in the background, and stress-test your system using Cinebench R23 (free) or simply run your most demanding game for 15 minutes. Watch temperatures throughout.
Safe Operating Temperature Reference Table
| Component | Idle (°C) | Under Load (°C) | Critical Threshold (°C) |
|---|---|---|---|
| Desktop CPU | 30–50 | 60–80 | 90+ |
| Laptop CPU | 35–55 | 75–95 | 100+ |
| Desktop GPU | 35–55 | 65–85 | 95+ |
| Laptop GPU | 40–60 | 70–90 | 95+ |
| NVMe SSD | 35–50 | 55–70 | 80+ |
| Motherboard | 25–40 | 40–60 | 70+ |
If your system consistently hits critical thresholds, thermal throttling kicks in automatically — your CPU or GPU reduces its clock speed to limit heat output. This is the direct cause of sudden FPS drops during gaming, stuttering during video playback, or sluggish response during rendering tasks.
How to Fix PC Overheating: Step-by-Step
Work through these steps in order. Most systems — probably 80% of cases — are fully resolved by Steps 1 through 3. Reserve the later steps for persistent problems.
Step 1: Clean Your PC Thoroughly
Cost: $5–10 | Time: 15–30 minutes | Impact: High
Remove both side panels and use compressed air to clear dust from every cooling surface:
- CPU heatsink fins — spray from multiple angles to dislodge packed dust between fins
- GPU heatsink and fan blades — hold fan blades still while spraying to prevent bearing damage
- Case fans (front, rear, top) — spray from outside the case inward, then blow through
- Power supply intake grille — spray from outside only; never open a PSU
- All visible vents and intake filters — these clog fastest
Hold all fans stationary during cleaning. A spinning fan can build enough voltage to damage connected components. Never use a household vacuum — static discharge from vacuum nozzles can instantly destroy motherboard components.
Clean every 6 to 12 months under normal conditions. Every 3 to 4 months if you have pets, live in a dusty environment, or keep your PC on the floor.
Step 2: Reorganize Cables for Better Airflow
Cost: $0–15 for cable ties | Time: 20–40 minutes | Impact: Medium–High
Open your case and look at the path between your front intake fans and the rear exhaust. If cables are crossing that path, they’re restricting airflow.
Route cables behind the motherboard tray using the built-in cable management channels most modern cases provide. Bundle together SATA power leads, GPU power cables, and fan headers using zip ties or Velcro straps. Tuck excess cable length behind the tray.
This alone can reduce case temperatures by 5 to 10°C and costs nothing if you already have cable ties.
Step 3: Replace Thermal Paste
Cost: $6–15 | Time: 20–45 minutes | Impact: Very High (on older systems)**
This is the most impactful fix for CPUs older than 3 years. Here’s the exact process:
- Power down completely and unplug from the wall outlet
- Remove the CPU cooler (4 screws on Intel LGA sockets; cam-lock or screws on AMD AM4/AM5)
- Wipe old paste off both the CPU heat spreader and heatsink base using 90%+ isopropyl alcohol and a lint-free cloth or coffee filter — no residue left behind
- Apply a pea-sized dot (approximately 4mm) of new paste at the center of the CPU heat spreader
- Reinstall the cooler with even, firm downward pressure — do not slide it after contact to avoid creating air bubbles
- Boot and open HWMonitor to verify temperature improvement
Recommended compounds: Arctic MX-6, Noctua NT-H1, Thermal Grizzly Kryonaut. All three perform similarly in real-world testing. The brand matters far less than proper application and full surface coverage.
Step 4: Verify Fan Operation and Upgrade If Needed
Cost: $10–40 per fan | Time: 20–30 minutes | Impact: Medium–High
Open HWMonitor and check fan RPM readings while your PC is running. If any fan shows 0 RPM — and that fan is connected and should be spinning — it has failed and needs replacement.
For upgrades, 120mm and 140mm fans from Arctic, Noctua, or be quiet! cost $10 to $25 each and deliver significantly better airflow and lower noise than typical stock fans. Adding two 140mm fans to the front intake is the single highest-impact airflow upgrade available for most mid-tower cases.
Step 5: Upgrade Your CPU Cooler
Cost: $35–150 | Time: 45–90 minutes | Impact: High
If you’re running an Intel Core i7/i9 or AMD Ryzen 7/9 processor on a stock or budget cooler, an aftermarket tower cooler is the most direct thermal upgrade available.
Mid-range air coolers worth choosing:
| Cooler | Price | TDP Capacity | Notes |
|---|---|---|---|
| Deepcool AK400 | ~$40 | 220W | Best value; outperforms most competitors at this price |
| Cooler Master Hyper 212 EVO V2 | ~$35 | 150W | Proven budget performer |
| Noctua NH-U12S Redux | ~$50 | 190W | Premium build quality; very quiet |
| Noctua NH-D15 | ~$100 | 250W | Consistently outperforms 240mm AIO coolers |
| Corsair H100i (240mm AIO) | ~$120 | Excellent | Best for small cases where large air coolers won’t fit |
One common misconception: liquid cooling is not always better than air cooling. A Noctua NH-D15 consistently outperforms 240mm AIO coolers in independent thermal benchmarks. AIOs are the right choice when case clearance prevents large air towers from fitting — not because liquid cooling is categorically superior.
Step 6: Adjust Fan Curves in BIOS or Software
Cost: Free | Time: 15–30 minutes | Impact: Medium
Most motherboards ship with conservative fan curves that prioritize silence — fans stay slow until temperatures reach 75 to 80°C before ramping up aggressively. Changing this means your system stays cooler by running fans faster at lower temperatures.
To adjust in BIOS: Press Delete or F2 at boot (varies by manufacturer), navigate to the fan control section, and change the profile from “Silent” to “Standard” or “Performance.” Some motherboards offer full curve editing with temperature-to-RPM mapping.
For software control: Fan Control (free, open-source, Windows) gives you precise curve editing per-sensor without entering BIOS. It’s one of the cleanest utilities available and works with most motherboard fan headers.
Step 7: Undervolt Your CPU or GPU
Cost: Free | Time: 1–2 hours to dial in stable settings | Impact: Medium**
Undervolting reduces the voltage your processor or graphics card receives, directly cutting heat output. Most chips from Intel, AMD, and NVIDIA ship with more voltage than stable operation actually requires — manufacturers add a safety buffer.
For NVIDIA GPUs: Open MSI Afterburner → click the voltage/frequency curve editor → reduce voltage while maintaining clock speed targets. A conservative 50 to 100mV undervolt typically lowers GPU temperatures by 5 to 12°C under load. GPU performance often improves because the card can sustain its boost clocks longer without hitting thermal limits.
For Intel CPUs: Use Intel Extreme Tuning Utility (Intel XTU) to apply a negative voltage offset. Start at -50mV and run Cinebench R23 or Prime95 for 20 minutes to check stability. Increase the offset in -25mV increments until you find the stability limit.
For AMD Ryzen: Use Ryzen Master. The Precision Boost Overdrive (PBO) feature with Curve Optimizer can reduce per-core voltages for lower temperatures and better sustained performance.
Step 8: Scan for Malware
Cost: Free | Time: 30–60 minutes | Impact: High (if malware is present)**
If your CPU is above 55°C at idle with nothing visibly open, malware is a strong candidate. Cryptomining malware specifically targets CPU and GPU cycles — running them at sustained maximum load around the clock.
Run a Windows Defender Full Scan (Windows Security → Virus & Threat Protection → Full Scan) or Malwarebytes Free (free version covers on-demand scanning). If an active infection is found and removed, temperatures return to normal immediately and completely.
Common Overheating Myths That Waste Your Time and Money
Myth 1: “More Fans Always Mean Cooler Temperatures”
More fans help only when they’re part of a coherent, directional airflow path. Adding fans pointed in random directions creates turbulence that disrupts clean air movement and can actually raise temperatures. Before adding more fans, establish the correct front-intake, rear-exhaust configuration first. Then add fans if temperatures still need improvement.
Myth 2: “Laptops Are Supposed to Run That Hot”
Laptops run warmer than desktops because of their compact design — but consistent temperatures above 95°C under normal workloads are not acceptable or expected. Laptops benefit from repasting every 2 to 3 years, laptop cooling pads when used on soft surfaces that block intake vents, and clearing compressed air through the exhaust vents annually. These steps can extend a laptop’s functional lifespan by several years.
Myth 3: “Thermal Throttling Means Your PC Is Protecting Itself, So It’s Fine”
Thermal throttling is an emergency protection mechanism — not an acceptable operating state. A CPU dropping from 4.8GHz to 2.9GHz to stay within thermal limits delivers 30 to 40% less computational performance. The hardware protection prevents immediate damage, but the underlying cause — inadequate cooling — is still degrading components over time and robbing you of the performance you’re paying for.
Myth 4: “Liquid Cooling Is Always Superior to Air Cooling”
This is one of the most persistent myths in PC building communities. A $100 Noctua NH-D15 air cooler consistently outperforms $120 to $130 240mm AIO liquid coolers in real-world thermal benchmarks on the same CPUs. Liquid cooling excels in small form-factor builds where physical dimensions prevent large air towers from fitting — not because water is a better cooling medium at this price tier.
Desktop vs. Laptop: Key Overheating Differences
| Factor | Desktop | Laptop |
|---|---|---|
| Cleaning access | Easy | Requires screwdrivers |
| Repaste frequency | Every 3–5 years | Every 2–3 years |
| Upgrade options | Extensive | Very limited |
| Airflow user control | Full | Minimal |
| Typical safe load temp | 75–85°C | 85–95°C |
| Thermal pads (VRAM) | Rarely needed | Often degrade |
Frequently Asked Questions
Why is my PC overheating all of a sudden when it was fine before?
Sudden overheating on a previously stable system typically points to one of three causes: a fan has failed (check RPM readings in HWMonitor), thermal paste has finally reached the end of its usable lifespan (common after 3 to 4 years), or a new background process — possibly an auto-updated application or malware — is now pushing CPU or GPU usage significantly higher than before.
Can PC overheating permanently damage my hardware?
Yes. Sustained temperatures above safe thresholds degrade CPU and GPU silicon over time through a process called electromigration, shorten capacitor lifespan on the motherboard, and can cause sudden, permanent component failure. Most modern systems throttle or shut down before immediate catastrophic damage occurs, but chronic overheating meaningfully accelerates long-term hardware degradation even without visible symptoms.
How often should I clean my PC to prevent overheating?
Every 6 to 12 months for most users in normal home environments. Every 3 to 4 months if you have pets — particularly long-haired cats or dogs. PCs sitting directly on carpet or in dusty environments accumulate debris significantly faster than those on hard surfaces in cleaner spaces.
Is 80°C too hot for my CPU?
For a desktop CPU under sustained load, 80°C is on the high end of acceptable but not immediately dangerous. Most modern desktop CPUs have a TJ Max rating of 100°C, but operating consistently above 85°C accelerates long-term silicon degradation. If you’re hitting 80°C at idle, that is a serious problem. If your CPU hits 90°C+ under gaming or workloads, your cooling needs attention.
Does PC overheating cause FPS drops and game stuttering?
Yes, directly and measurably. When your GPU or CPU hits its thermal limit, it automatically reduces clock speed to lower heat output — this is thermal throttling in action. The result is inconsistent frame rates, mid-game FPS drops, and stuttering that has nothing to do with GPU performance. Fixing the thermal problem eliminates the stuttering entirely, often without any hardware upgrade.
Can a newly installed game cause my PC to overheat?
Yes. A new release that pushes your GPU harder than previous titles can expose a thermal bottleneck that lighter workloads never revealed. The game isn’t defective — your cooling system was marginal, and the new workload crossed the threshold where insufficient cooling becomes visible. This is especially common when moving from older titles to recent AAA releases.
Should I repaste my laptop if it’s overheating?
Yes — particularly if it’s more than 2 to 3 years old. Laptop thermal paste degrades faster than desktop paste due to more extreme thermal cycling in confined spaces. Many laptops also use thermal pads on GPU VRAM and memory controller chips that flatten and lose conductivity over time. Most PC repair shops offer laptop thermal repasting for $40 to $80 if you’d prefer professional service over DIY.
What is thermal throttling and how do I know if it’s happening to my PC?
Thermal throttling is your CPU or GPU automatically reducing its operating frequency to lower heat output and stay below its maximum temperature threshold. In HWiNFO64, check the “Thermal Throttling” status field under your CPU sensors. Alternatively, open CPU-Z during a stress test — if your CPU’s clock speed drops significantly below its advertised boost frequency mid-test, throttling is occurring.
Conclusion
PC overheating is almost always fixable — and in the majority of cases, the solution costs less than $15 and under an hour of your time.
Start with the fundamentals: clean your PC, confirm temperatures with HWMonitor, and check Task Manager for suspicious CPU usage. Replacing thermal paste on any system older than 3 years and reorganizing cables for better airflow resolves the problem in most situations. Reserve cooler upgrades and undervolting for systems where the basics aren’t sufficient.
The key point: heat problems don’t resolve themselves. Each hour your system runs at critical temperatures shortens the lifespan of components that cost hundreds to replace.
Your next step: Download HWMonitor right now, run Cinebench R23 for 15 minutes, and note your peak CPU and GPU temperatures. That single action tells you exactly how serious your overheating problem is and which step in this guide to prioritize first.
Turn your free time into learning time with our productive reading picks.