
Your Windows 11 PC is slowing down. Apps stall, browsers feel sluggish, the C: drive is running low. Nine times out of ten, accumulated cache is part of the problem. Cache clears itself, but only partially — and on older installations, it quietly eats gigabytes of space you need.
This guide covers every cache type on Windows 11: temporary files, browser cache, DNS cache, Microsoft Store cache, and thumbnail cache. Each section gives you exact steps, no fluff.
What Is Cache and Why Does It Build Up on Windows 11?
Cache is temporary storage. Windows 11 and the apps running on it save frequently used data — website assets, thumbnail images, DNS lookups, installer fragments — so they can load faster next time. That’s the upside.
The downside: cache grows indefinitely until you clear it. A fresh Windows 11 install might hold a few hundred megabytes of temporary files. After a year of regular use, that number can easily reach 5–10 GB. In my testing on a mid-range laptop with 12 months of use, the Disk Cleanup utility found 7.4 GB ready to delete on first run.
Corrupted cache is a separate issue. A broken thumbnail cache causes Explorer to show blank icons. A stale DNS cache makes websites fail to load even when your internet is fine. Clearing cache doesn’t just free space — it forces Windows to rebuild clean data from scratch.
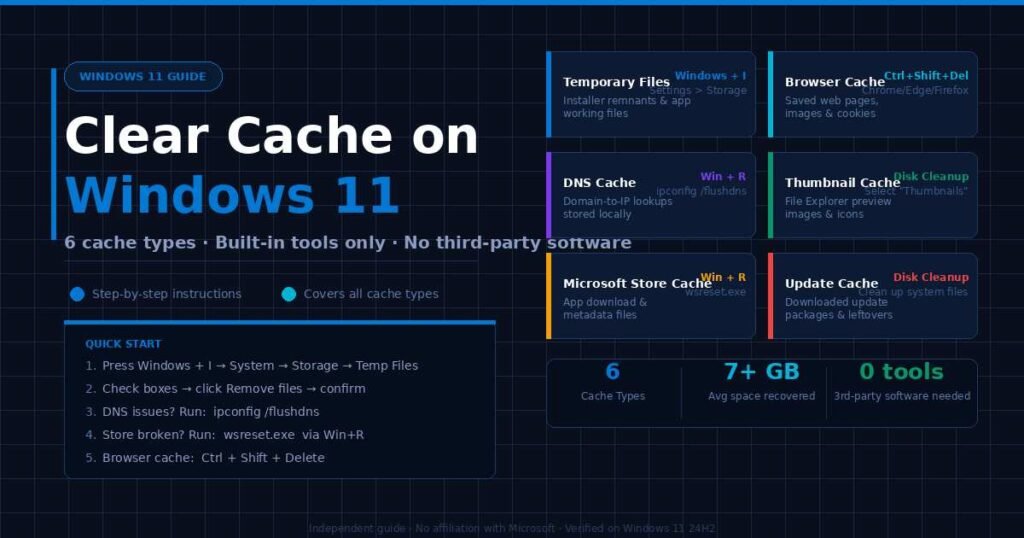
The six main cache types in Windows 11:
| Cache Type | What It Stores | Main Symptom When Stale |
|---|---|---|
| Temporary Files | Installer remnants, app working files | Low disk space, slow installs |
| Browser Cache | Web page assets, cookies | Sites load slowly or show outdated content |
| DNS Cache | Website domain-to-IP lookups | Websites fail to load correctly |
| Thumbnail Cache | Folder preview images | Blank icons in File Explorer |
| Microsoft Store Cache | App download metadata | Store errors, failed app installs |
| Windows Update Cache | Downloaded update packages | Update failures, stuck installs |
How to Clear Temporary Files on Windows 11 (Settings Method)
The Settings app in Windows 11 is the cleanest way to remove temporary files. It shows you exactly how much space each category uses before you delete anything.
Steps:
- Press Windows + I to open Settings.
- Click System in the left sidebar.
- Click Storage.
- Click Temporary files (Windows calculates the totals — give it 10–20 seconds).
- Check the categories you want to remove. Safe picks for most users:
- Temporary files
- Delivery Optimization Files
- Thumbnails
- Windows Update Cleanup
- System created Windows Error Reporting
- Click Remove files.
- Click Continue when the confirmation prompt appears.
One thing to watch: Don’t check the Downloads folder option unless you’ve already moved or backed up everything in there. It will delete your actual downloaded files, not just cache.
In my experience, Delivery Optimization Files and Windows Update Cleanup together usually account for the biggest chunk — sometimes 3–4 GB on their own. Always check those two first.
How to Use Disk Cleanup on Windows 11
Disk Cleanup is the older tool, but it’s still reliable and adds one feature the Settings method doesn’t: System Files cleanup, which removes old Windows installation files after a major update.
Steps:
- Press Windows + S and type
Disk Cleanup. - Click Disk Cleanup in the results.
- Select your C: drive from the dropdown and click OK.
- Wait for the scan to complete.
- Check the boxes next to file categories you want deleted. Standard safe picks:
- Temporary Internet Files
- Temporary Files
- Thumbnails
- Recycle Bin
- To access system-level files, click Clean up system files (runs as administrator).
- After the additional scan, you’ll see Windows Update Cleanup and Previous Windows Installation(s) — these can reclaim several gigabytes.
- Click OK, then Delete Files to confirm.
Note: “Previous Windows Installation” only appears after a version upgrade. It’s safe to delete once you’ve confirmed your new Windows version is running correctly — but you can’t roll back after deletion.
How to Clear Browser Cache on Windows 11
Browser cache and Windows system cache are separate. Clearing one doesn’t clear the other. Here’s how to clear it in the three most-used browsers on Windows 11.
Google Chrome
- Press Ctrl + Shift + Delete to open the Clear Browsing Data panel.
- Set Time range to All time.
- Check Cached images and files.
- Optionally check Cookies (clears saved logins) and Browsing history.
- Click Clear data.
Microsoft Edge
- Press Ctrl + Shift + Delete.
- Set Time range to All time.
- Check Cached images and files.
- Click Clear now.
Mozilla Firefox
- Click the Menu button (three lines, top right).
- Go to Settings > Privacy & Security.
- Under Cookies and Site Data, click Clear Data.
- Uncheck Cookies and Site Data — leave only Cached Web Content checked.
- Click Clear.
Ctrl + Shift + Delete is a universal shortcut that works in Chrome, Edge, and Firefox. Commit it to memory — it saves a lot of menu-clicking.
How to Flush DNS Cache on Windows 11
DNS cache stores website addresses locally so your PC doesn’t need to look them up from scratch every visit. When that cache becomes stale or corrupted, pages fail to load even though your internet connection is working fine.
Flushing DNS takes under 30 seconds using the Run dialog.
Steps using Run (fastest method):
- Press Windows + R to open the Run dialog.
- Type:
ipconfig /flushdns - Press Enter.
- A Command Prompt window opens briefly and confirms: “Successfully flushed the DNS Resolver Cache.”
Steps using Command Prompt:
- Press Windows + S, type
cmd, right-click Command Prompt, select Run as administrator. - Type:
ipconfig /flushdns - Press Enter.
After flushing DNS, the first load of previously visited websites may be slightly slower — Windows has to look up the IP addresses fresh. That’s normal, and it only happens once per site.
How to Clear Microsoft Store Cache on Windows 11
If the Microsoft Store is freezing, throwing download errors, or refusing to install apps, a corrupted Store cache is usually the culprit. Microsoft built a dedicated reset command for exactly this scenario.
Steps:
- Press Windows + R to open Run.
- Type:
wsreset.exe - Press Enter.
- A blank black Command Prompt window appears. Don’t close it — this is normal.
- Wait for it to close on its own (usually 10–15 seconds).
- The Microsoft Store opens automatically when done, confirming success.
This command only clears the Store cache. Your installed apps, saved game data, and app settings are not affected.
How to Clear Thumbnail Cache on Windows 11
Thumbnail cache stores the small preview images Windows shows for photos, videos, and documents in File Explorer. When it becomes corrupted, you see blank icons or outdated previews instead of the actual file content.
Steps:
- Open Disk Cleanup (search for it in the Start menu).
- Select your C: drive.
- Check Thumbnails in the file list.
- Click OK, then Delete Files.
Alternatively, delete it manually:
- Press Windows + R, type
%localappdata%\Microsoft\Windows\Explorerand press Enter. - Close all open File Explorer windows first.
- Delete all files named
thumbcache_*.db. - Restart File Explorer (or your PC).
Windows rebuilds the thumbnail cache automatically the next time you open a folder. The first browse will be slightly slower as it generates new previews.
Common Cache-Clearing Mistakes to Avoid
Mistake 1: Deleting the Downloads folder thinking it’s cache. The Downloads folder in Disk Cleanup is your actual Downloads folder — not a cache folder. Check it only if you’ve deliberately cleared out your downloads first.
Mistake 2: Using third-party “PC cleaner” apps. Windows 11 includes everything you need to clear cache safely. Third-party cleaners often target the wrong files, install bloatware, or aggressively flag legitimate system files. In practice, the built-in tools recover the same space without the risk.
Mistake 3: Clearing cache to fix RAM issues. Cache files live on your disk (SSD or HDD), not in RAM. Clearing disk cache does not free up memory. If you’re hitting RAM limits, that’s a different problem — and restarting your PC is the fastest fix.
Mistake 4: Deleting Windows prefetch files. You’ll sometimes see advice to delete files in C:\Windows\Prefetch. These files actually speed up app launch times by pre-loading data Windows predicts you’ll need. Deleting them makes your PC slower on first boot, not faster.
Mistake 5: Running cache clears every day. Weekly or monthly is enough for most users. Running Disk Cleanup daily doesn’t prevent buildup — it just forces Windows to rebuild caches from scratch repeatedly, which wastes time.
How to Automate Cache Clearing with Storage Sense
If you’d rather not run manual cleanups, Storage Sense handles temporary file removal automatically on a schedule you control.
Steps to enable and configure Storage Sense:
- Press Windows + I to open Settings.
- Go to System > Storage.
- Click Storage Sense (toggle it on if it’s off).
- Click on Storage Sense to open configuration options.
- Set Run Storage Sense to your preferred schedule:
- Every day
- Every week
- Every month
- During low disk space (default)
- Under Temporary Files, enable Delete temporary files that my apps aren’t using.
- Set the Recycle Bin and Downloads cleanup thresholds if needed.
- Click Run Storage Sense now to do an immediate pass.
Storage Sense won’t touch browser cache or DNS cache — those still require manual clearing. But for system temporary files, it’s a solid set-and-forget option.
Frequently Asked Questions
Is it safe to clear cache on Windows 11? Yes, clearing system cache on Windows 11 is safe. Windows and your apps rebuild cache automatically when they need it. The only thing to watch out for is the Downloads folder in Disk Cleanup — that contains your real files, not cache. Everything else in the standard Disk Cleanup list is safe to remove.
How much space can I recover by clearing cache on Windows 11? It varies by how long since the last cleanup and how heavily the PC is used. On a typical system that hasn’t been cleaned in 6–12 months, you can usually recover 2–8 GB. Systems with pending Windows Updates or old upgrade files can recover significantly more.
Does clearing cache speed up Windows 11? It can, but only in specific ways. Clearing a corrupted thumbnail cache fixes slow File Explorer browsing. Flushing DNS fixes website loading issues. Clearing browser cache can speed up sites loading stale content. But if your PC is generally slow, low disk space or insufficient RAM are more likely culprits.
How often should I clear cache on Windows 11? Monthly is reasonable for most users. If you’re running low on disk space or troubleshooting a specific issue, do it as needed. For hands-off maintenance, Storage Sense can automate this.
Will clearing cache delete my saved passwords or files? No — system cache clearing via Settings or Disk Cleanup does not touch your passwords, personal files, or app settings. Browser cache clearing can clear cookies (which logs you out of sites) if you check that option, but cached images and files can be cleared without affecting passwords.
Why is my Windows 11 DNS cache not flushing? Run Command Prompt as administrator, not just as a regular user. Standard permission levels don’t always have access to flush DNS. Right-click Command Prompt in the search results and select Run as administrator, then run ipconfig /flushdns.
Can I clear the Windows 11 Page File as a form of cache clearing? The page file is virtual memory, not cache. Don’t delete or manually clear it — Windows manages it automatically. Messing with the page file can cause system instability.
What’s the difference between clearing cache and disk cleanup? Disk Cleanup is a specific Windows tool that clears several types of cache in one pass: temp files, thumbnails, Windows Update remnants, and more. “Clearing cache” is a broader term that includes browser cache, DNS cache, and app-specific caches that Disk Cleanup doesn’t touch.
Final Thoughts
Clearing cache on Windows 11 isn’t one action — it’s a handful of targeted steps, each aimed at a different part of the system. The Settings > Temporary Files route handles the bulk of disk clutter. Browser cache and DNS cache need separate attention. Microsoft Store issues get their own dedicated command.
For most users, the practical routine is this: run Temporary Files cleanup monthly, flush DNS when websites misbehave, clear browser cache when a site is showing outdated content, and run wsreset.exe when the Store acts up. That covers 90% of cases without touching anything risky.
Storage Sense can handle the monthly cleanup automatically — turn it on once and leave it. The manual steps are there for when something specific breaks.
Discover ideas that stick with you long after reading our memorable expert posts.