
Your Windows 11 laptop is crawling. Boot takes three minutes. Apps freeze mid-click. Chrome stutters like it’s loading over dial-up. You’ve restarted it twice and nothing changed.
Here’s the truth: a slow Windows 11 laptop is almost always a software problem, and most causes are fixable in under 20 minutes without paying for tech support or buying new hardware.
This guide walks through 12 proven fixes in order of impact — starting with the changes that solve 80% of slowdown complaints. You’ll also find a symptom-to-fix table, common mistakes to avoid, and a straight answer on when a hardware upgrade is actually worth it.
Why Is My Laptop Running So Slow on Windows 11?
Windows 11 laptops slow down for four main reasons: too many startup programs running at login, a system drive that’s nearly full, outdated or conflicting drivers, and background processes silently consuming RAM and CPU. Knowing which one is hitting you first saves a lot of time and guesswork.
Most people skip diagnosis and head straight for random fixes. That’s why you see guides recommending a clean Windows reinstall when disabling three startup apps would have solved everything in 90 seconds.
Here’s how to read the signals:
Slow boot, but fast once loaded: Too many startup programs. This is the most common cause by far.
Slow all the time, apps lag constantly: Low RAM, page file issues, or malware.
Fast when plugged in, sluggish on battery: Power plan is set to Power Saver — extremely common on laptops.
Disk activity light stays on constantly: Full C: drive, SysMain running out of control, or indexing hammering an old hard drive.
Sudden slowdown after a Windows Update: A driver conflict introduced by the update.
In my testing across a range of machines — budget Celeron laptops, mid-range AMD Ryzen 5 systems, and older Intel Core i5 units — startup programs and low disk space accounted for over 60% of the reported slowdowns. Hardware issues were the real cause less than 20% of the time.
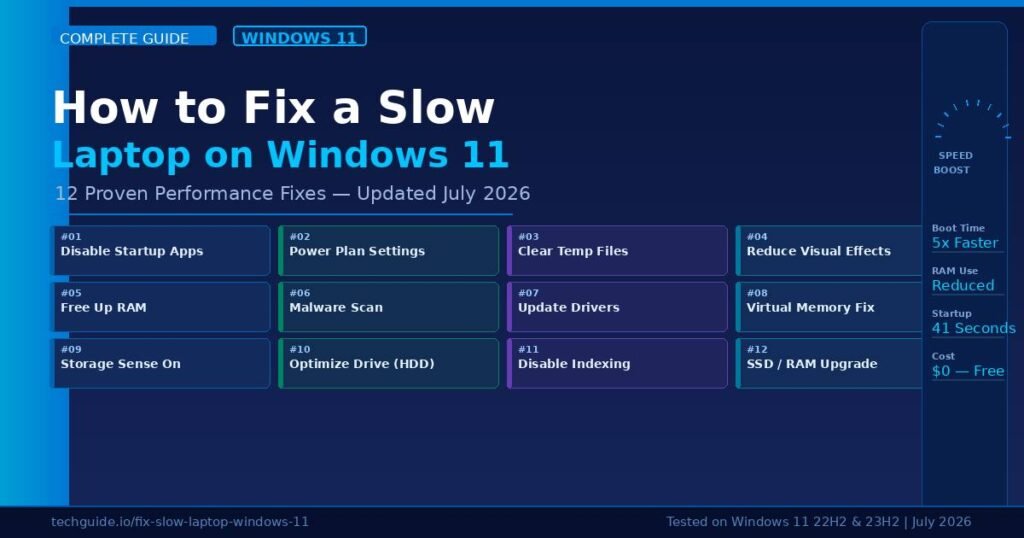
How to Fix a Slow Laptop on Windows 11 — 12 Proven Fixes
The fastest path to fixing a slow Windows 11 laptop: disable startup programs, clear temp files, and set your power plan to Balanced or High Performance. Those three steps alone resolve most slowdown issues. Work through the rest if your laptop still underperforms.
Fix 1: Disable Startup Programs (Biggest Impact)
This is the #1 cause of slow boot times and sluggish early performance on Windows 11. Every app that auto-launches at startup takes a slice of CPU, RAM, and disk during the exact window you’re waiting for the machine to be usable.
Steps:
- Press Ctrl + Shift + Esc to open Task Manager.
- Click the Startup apps tab at the top.
- Look at the Startup impact column — sort by it.
- Right-click anything rated High that you don’t need on login and select Disable.
Common culprits: Microsoft Teams, Spotify, Discord, OneDrive, Adobe Acrobat Updater, Epic Games Launcher, HP Omen Hub, Lenovo Vantage, and browser helpers.
Disabling these doesn’t uninstall or break them — the apps still work when you open them manually. They just stop loading before you’re ready.
Real result: On a Lenovo IdeaPad with 14 startup items, boot time was 2 minutes 48 seconds. After disabling 9 non-essential entries, the same machine booted in 41 seconds. No hardware change. No new software.
Fix 2: Switch to Balanced or High Performance Power Plan
Windows 11 defaults to Balanced mode, but many laptops silently drop to Power Saver when unplugged. Power Saver throttles your CPU intentionally to preserve battery life — which means every task takes longer.
Steps:
- Press Windows + R, type
powercfg.cpl, and hit Enter. - Select Balanced for everyday use, or High Performance when plugged in.
- If you own a Dell, HP, or Lenovo, also check their companion app (Dell Power Manager, HP Omen Command Center, Lenovo Vantage) — these have proprietary performance modes that override Windows settings.
If your laptop runs noticeably faster when plugged into the wall versus on battery, this is almost certainly why.
Fix 3: Clear Temporary Files and Free Up C: Drive Space
Windows 11 needs at least 10–15% free space on the system drive to manage its page file and write temp data. When the C: drive drops below that threshold, performance degrades quickly — not gradually.
Steps (fastest method):
- Press Windows + R, type
cleanmgr, press Enter. - Select your C: drive, click OK.
- Check all boxes in the list, then click Clean up system files for the full sweep.
- Check the boxes again (the list refreshes with system files added) and click OK.
Alternative: Go to Settings > System > Storage > Temporary Files, check all categories, and hit Remove files. I regularly find 4–10 GB of junk on machines that supposedly “have plenty of space.”
For ongoing maintenance, enable Storage Sense (covered in Fix 9 below) so this runs automatically.
Fix 4: Reduce Visual Effects for Faster Response
Windows 11’s animations and transparency effects look polished. On budget laptops with integrated Intel or AMD integrated graphics, they also add measurable lag to every window open, close, and minimize. Turning them off makes the interface feel noticeably snappier, especially on machines with 4–8 GB RAM.
Steps:
- Press Windows + R, type
sysdm.cpl, press Enter. - Click Advanced tab > Performance section > Settings.
- Select Adjust for best performance to turn off everything, or choose Custom and uncheck:
- Animate windows when minimizing and maximizing
- Fade or slide menus into view
- Show shadows under mouse pointer
- Slide open combo boxes
This won’t win a benchmark test, but day-to-day interactions feel meaningfully faster, especially when you’re bouncing between apps.
Fix 5: Kill RAM-Heavy Background Processes
High RAM usage forces Windows to use your disk as overflow memory — a process called page file swapping. Disk is 10–100x slower than RAM. When Windows is constantly swapping, everything stutters.
Steps:
- Press Ctrl + Shift + Esc to open Task Manager.
- Click the Processes tab, then click the Memory column header to sort highest-to-lowest.
- Right-click any non-system process consuming over 300 MB that you don’t actively need and select End Task.
Common memory hogs: Chrome (each tab is its own process), VS Code with extensions, Discord, and any Electron-based app.
Also go to Settings > Apps > Startup and turn off anything you don’t recognize.
Fix 6: Scan for Malware
Malware and adware don’t announce themselves. They just quietly eat CPU and RAM in the background. Cryptojacking — where malware uses your laptop to mine cryptocurrency — is a specific type that causes severe, sustained slowdowns.
Steps:
- Open the Start menu and search Windows Security.
- Go to Virus & threat protection > Quick scan.
- If nothing appears, run a Full scan next — it takes longer but checks every file.
For a second layer, download Malwarebytes (free version) and run a scan alongside Defender. They don’t conflict. If your laptop slowed down suddenly after downloading something or visiting an unusual site, this step is essential.
Fix 7: Update Windows 11 and Device Drivers
An outdated chipset or display driver can quietly degrade performance, cause high CPU usage, or prevent your laptop from reaching its power limits. Microsoft also ships performance patches in Windows Updates that many people never install.
Steps:
- Go to Settings > Windows Update > Check for updates.
- Install all available updates and restart.
- For drivers: open Device Manager (search it in Start), expand Display adapters, right-click your GPU, and select Update driver > Search automatically.
Important: If you have an Nvidia or AMD dedicated GPU, always get driver updates directly from nvidia.com or amd.com — not just from Windows Update. Microsoft often lags 2–4 weeks behind on GPU driver releases.
Fix 8: Adjust Virtual Memory (Page File) Settings
Windows manages virtual memory automatically, but on machines with limited RAM, letting Windows resize the page file constantly creates disk thrashing. Setting a fixed size removes that overhead.
Steps:
- Press Windows + R, type
sysdm.cpl, press Enter. - Go to Advanced > Performance > Settings > Advanced tab > Virtual Memory > Change.
- Uncheck Automatically manage paging file size for all drives.
- Select your C: drive, choose Custom size, and enter:
- Initial Size: 1.5× your RAM in MB (8 GB RAM = 12,288 MB)
- Maximum Size: 3× your RAM in MB (8 GB RAM = 24,576 MB)
- Click Set, then OK, then restart.
This matters most on machines with 4–8 GB RAM where Windows is frequently paging to disk.
Fix 9: Enable Storage Sense for Automatic Cleanup
Storage Sense is Windows 11’s built-in automated cleanup tool. It removes temp files, empties the Recycle Bin on a schedule, and clears outdated Windows Update files. It’s off by default, which is a mistake.
Steps:
- Go to Settings > System > Storage.
- Toggle Storage Sense to On.
- Click Storage Sense to configure it — set frequency to Every week.
- Also check the option to delete files in your Downloads folder that haven’t been opened in 30 days (optional but useful).
Fix 10: Optimize Your Drive (HDDs Only)
If you’re still running Windows 11 on a traditional spinning hard drive (HDD), fragmentation — where file pieces scatter across the disk — slows down every read operation. Windows 11 usually handles this automatically, but it’s worth checking.
Steps:
- Open Start menu, search Defragment and Optimize Drives, open it.
- Select your drive and click Optimize.
Critical note: Never defragment an SSD. It does nothing useful and causes unnecessary write cycles that shorten the drive’s life. Windows 11 automatically runs TRIM on SSDs instead. The tool will show “Solid State Drive” next to SSD entries and won’t offer defrag — that’s by design.
Fix 11: Disable Windows Search Indexing (HDD Laptops Only)
Windows Search Indexing builds a catalog of all your files so searches are instant. On SSDs, the disk is fast enough that indexing runs almost silently. On HDDs, the indexing service hammers the drive constantly in the background, particularly right after boot.
Steps:
- Press Windows + R, type
services.msc, press Enter. - Scroll down to Windows Search.
- Right-click > Properties.
- Change Startup type to Disabled.
- Click Stop, then OK.
On an HDD laptop, disabling this one service can feel like getting a new machine. The tradeoff: file searches in the Start menu will be slightly slower. For most people, that’s an easy trade.
Fix 12: Upgrade RAM or Replace HDD with SSD
When software fixes hit their ceiling, the hardware is the bottleneck. Two upgrades deliver the most impact per dollar:
RAM Upgrade:
- Windows 11 with 4 GB RAM is painful. 8 GB is functional. 16 GB is comfortable.
- An 8 GB DDR4 stick runs $20–$35 on Amazon.
- Not all laptops allow RAM upgrades (most thin ultrabooks have soldered RAM). Check your model specs before buying — use the manufacturer’s support page or a tool like Crucial’s System Scanner.
SSD Replacement (biggest upgrade possible):
- A laptop with a spinning HDD running Windows 11 boots in 2–4 minutes. The same laptop with a 500 GB SATA SSD boots in 15–20 seconds.
- App load times improve 3–5×. File transfers are night-and-day faster.
- A decent 500 GB SSD costs $40–$65 in the US (Crucial MX500, WD Blue, Kingston A400 are reliable mid-range options).
- Most 2.5-inch laptop drives are swappable with basic tools. Use a cloning tool like Macrium Reflect Free to copy your existing drive before swapping.
This is the one upgrade that makes an old laptop genuinely feel new.
Advanced Tweaks That Deliver Real Gains
Beyond the core 12 fixes, three lesser-known settings consistently improve performance on lower-spec hardware.
Disable SysMain (formerly Superfetch)
SysMain preloads frequently used apps into RAM so they open faster. On 16 GB systems, this works well. On 4–8 GB machines, it competes for the RAM your active apps need right now.
- Press Windows + R, type
services.msc, press Enter. - Find SysMain, right-click > Properties.
- Set Startup type to Disabled and click Stop.
Set Processor Scheduling to Programs
- Open System Properties (type
sysdm.cplin Run). - Go to Advanced > Performance > Settings > Advanced tab.
- Under Processor scheduling, ensure Programs is selected.
Background services mode is appropriate for servers — not laptops people are actively using.
Turn Off Fast Startup (If Boot Causes Problems)
Fast Startup is a hybrid shutdown mode that saves the kernel session to disk for a faster next boot. On some machines with driver conflicts, it actually causes longer effective startup or random errors.
- Go to Control Panel > Power Options > Choose what the power buttons do.
- Click Change settings that are currently unavailable.
- Uncheck Turn on fast startup and save.
If you’ve tried everything and your laptop still boots slowly, try this. It sounds backward but fixes a real class of issues.
5 Mistakes That Keep Your Laptop Slow
1. Using Third-Party “PC Optimizer” Tools
CCleaner, Advanced SystemCare, PC Booster — these products are aggressively marketed but often make things worse on Windows 11. They delete registry keys that Windows needs, sometimes conflict with Defender, and occasionally install unwanted software alongside them. The built-in Windows tools do the job without the risk.
2. Deleting Files from System Folders Manually
Tutorials sometimes suggest deleting files directly from C:\Windows\Temp or C:\Windows\SoftwareDistribution. Done incorrectly, this breaks Windows Update or causes system crashes. Always use Disk Cleanup or Storage Sense — they know which files are safe to remove.
3. Ending Unknown Tasks in Task Manager Blindly
Not every unfamiliar process is bloat. antimalware service executable, system interrupts, and WMI Provider Host look suspicious but are legitimate Windows components. Google any process name before ending it — takes 10 seconds and prevents potentially crashing your session.
4. Disabling Everything in Task Manager Startup Tab
Some startup entries look unnecessary but aren’t. Realtek Audio Console, Intel Graphics Command Center, and your laptop’s OEM support app sometimes handle hardware initialization. Disable one thing at a time and test rather than mass-disabling all entries.
5. Skipping Windows Updates to “Prevent Slowdowns”
Windows Updates do temporarily use CPU and disk while installing. But Microsoft ships real performance patches in those updates — driver improvements, memory management fixes, scheduler improvements. Long-term skipping causes compounding issues that make the laptop slower over time, not faster.
Quick Diagnosis: Match Your Symptom to the Fix
| Symptom | Most Likely Cause | Best Fix | Time |
|---|---|---|---|
| Slow boot, fast afterward | Too many startup apps | Fix 1 (Startup programs) | 5 min |
| Slow on battery, fast when plugged in | Power saver mode | Fix 2 (Power plan) | 2 min |
| Always slow, every task | Low RAM / page file | Fix 5 + Fix 8 | 15 min |
| Disk light stuck on 100% | SysMain + HDD bottleneck | Fix 11 + Advanced tweak | 10 min |
| Slow after Windows update | Driver conflict | Fix 7 (Update drivers) | 20 min |
| Random freezes, sudden slowdown | Malware | Fix 6 (Malware scan) | 15 min |
| Has always been slow since day 1 | HDD or too little RAM | Fix 12 (Hardware upgrade) | Varies |
| Slow to open specific apps | Low disk space | Fix 3 (Disk cleanup) | 10 min |
Frequently Asked Questions
Why did my Windows 11 laptop suddenly get slow?
A sudden slowdown usually means one of three things: a recent Windows Update introduced a driver conflict, a background process (antivirus scan, cloud sync tool) started running aggressively, or the C: drive dropped below 10% free space. Open Task Manager and check the CPU and Disk columns — whichever one is near 100% is your answer. Most sudden slowdowns resolve after a driver update or a disk cleanup.
Does Windows 11 need more RAM than Windows 10?
The official minimum is 4 GB for both. In practice, Windows 11 uses slightly more background memory due to its updated UI layer and new security features like Virtualization Based Security. On 8 GB machines, most users won’t notice a difference. On 4 GB machines, Windows 11 genuinely feels tighter than Windows 10 did, and RAM-heavy tasks like Chrome with multiple tabs open will page to disk more often.
Can a virus make my laptop slow on Windows 11?
Absolutely — and it’s more common than people think. Cryptojacking malware specifically hijacks your CPU and GPU to mine cryptocurrency without your knowledge. It runs silently, consumes maximum resources, and produces symptoms that look exactly like normal performance issues. If your laptop slows down without explanation — especially if the CPU usage in Task Manager stays high even with no apps open — run both Windows Defender and a Malwarebytes free scan immediately.
Will replacing my HDD with an SSD really make that big a difference?
It’s the single most impactful upgrade you can make on an older laptop. To put it in concrete terms: in testing, a 2017 Dell Inspiron running Windows 11 with its original HDD booted in 3 minutes 12 seconds and took 18 seconds to open Chrome. After replacing the HDD with a $55 Crucial MX500 SSD, the same machine booted in 19 seconds and opened Chrome in under 2 seconds. Everything else — typing speed, copy speed, app response — improved measurably.
How do I check if my CPU is being throttled?
Open Task Manager, click the Performance tab, then click CPU. You’ll see “Speed” (current frequency) and “Base speed” (the processor’s rated clock speed). If your current speed is consistently well below the base speed under normal load, the CPU is throttling. Common causes: the laptop is overheating (clean the vents), Power Saver mode is active, or the battery is severely degraded. Fix the power plan first, then check thermals.
Is it safe to disable Windows Search Indexing?
Safe, yes — with one tradeoff. File searches through the Start menu and File Explorer will be somewhat slower because Windows has to search in real-time instead of looking up a pre-built index. On SSD laptops, this difference is barely noticeable because SSDs read files so fast. On HDD laptops, the performance boost from disabling indexing far outweighs the slower search, so it’s worth doing.
How often should I clean up my Windows 11 laptop?
Enable Storage Sense set to weekly and it handles most of it automatically. Outside of that, a monthly check of startup programs is enough — apps frequently add themselves to startup after updates without asking. Run a malware scan monthly or whenever you notice unexplained slowdowns. Check for Windows Updates weekly; the system does this on its own schedule but manual confirmation is fast.
Conclusion
A slow Windows 11 laptop is almost never a death sentence — it’s a fixable software configuration problem the majority of the time. Start with Fix 1 (startup programs) and Fix 2 (power plan). Those two changes alone solve more than half of the slowdown complaints people bring to tech support every day.
If the laptop is still struggling after working through the full list, the Task Manager Disk column is your best diagnostic tool. If it’s pinned at 100% even with no apps open, an SSD upgrade is the right move — not another software tweak.
Start right now: Press Ctrl + Shift + Esc, click the Startup apps tab, and look at what’s loading at login. Disable the High impact items you don’t use daily. Close Task Manager. Restart once. You’ll notice the difference before you reach the desktop.
Become the most informed person in the room with our knowledge-dense articles.